

Why floss without getting the best floss possible? Flossing, an important but widely disliked aspect of dental hygiene, is a way to clean oral bacteria that a toothbrush can’t reach. However, by not flossing properly, it’s likely the bacteria below the gum line isn’t even being reached. Flossers then find themselves unknowingly wasting time and effort for minimal results.
What does it mean to achieve the best floss?
The task of flossing properly includes a few major, overarching guidelines from the ADA: consistency, precision, and remembering that any flossing is better than no flossing at all.
One of the most important parts of flossing is doing it regularly. At best, this should look like at least once a day, though twice is preferable.
It’s also necessary to be thorough, and totally cover the spaces between all of your teeth. The purpose of flossing is to help remove plaque and food debris from spots that a toothbrush can’t reach. If certain areas aren’t reached, buildup will occur. Too much food buildup, especially from starchy or sugary foods, creates more plaque, which will then release harmful acids that wear down your tooth enamel. This can ultimately lead to cavities, and even increase the risk of gum disease with tartar buildup. Thus, make sure you aren’t leaving any opportunities for dangerous buildup by flossing everywhere you can.
Being as thorough as you should be for a proper floss can take a few minutes. While flossing before bed is likely optimal, it’s far more important to floss daily, regardless of the time. Ultimately, you should pick the time that works best for you. Don’t fret about flossing first thing in the morning if you know that’s when you’ll be rushed. Rather, wait til you have time to properly devote. That way you’ll be much more likely to get the best floss possible.
Regarding the order of operations, a 2018 study suggested it’s better to floss before you brush. This is because flossing loosens bacteria, allowing your toothbrush to then clean the particles away. Brushing second also allows fluoride to work its way between your teeth, better combating interdental plaque. Like the time of day, this is another instance where completing the task at all is more important than doing it optimally, so don’t let concern about the order stop you from flossing.
What’s the best floss for me?
Beyond the basics we just covered, the best floss can be determined by the type of floss used and technique. Each of the main types of flossing (string floss, floss picks, and oral irrigators or water flossers) come with their own method of using. We’ll be covering each of those in this blog.
Everyone’s body is different, so different flossers are needed depending on factors like spacing between teeth, manual dexterity, and non-physical factors like how much time you can devote to flossing. We hope that by the end of this blog you have a better idea of which flossing method is right for you, how to floss correctly, and an understanding that any flossing is better than no flossing at all.
String Floss
String floss comes in a few varieties: unwaxed, waxed, woven, dental tape, and polytetrafluorethylene floss (PTFE). Unwaxed floss and PTFE floss are best for users with tight spaces between their teeth, while dental tape is made for those with gaps. Waxed floss aims for comfort and durability: the waxed coating makes it harder for the floss to break. Regardless of the different physical designs, all string floss follows the same flossing technique.
Here’s how to get the best floss using string:
- It’s recommended to break off about an 18 inch strand of floss to cover the whole mouth. Wind most of that strand around one index finger, leave 4-6 inches to floss with, and wind the rest around the other index finger.
- Grasp the floss tightly between thumbs and forefingers, using this hold to guide the strand between your teeth. You want to work the floss between teeth using a gentle sawing/rubbing motion – don’t force it between them, as this could send the floss sharply into your gums, resulting in gum damage and extra blood loss.
- When the floss reaches your gum line, curve it against the tooth in a C-shape, then scrape upwards and down across the tooth. Repeat this on each side of all teeth, making sure to be especially gentle around the gum line.
- Make sure to use a clean section of floss between each set of teeth so as to not re-disperse food particles and bacteria. Once the section you've been using is dirty, wind it with the floss on the index finger with the least amount. The 18-inches of floss on one finger is for easily accessing a new, clean section.
- Throw away your floss at the end – don’t reuse it. This isn’t the most environmentally friendly option, unfortunately. Alternatively, water flossers obviously create far less plastic waste than disposable string floss and floss picks, as detailed further below.
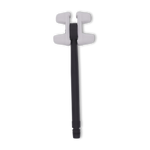
Floss Picks
Floss picks are designed to make the flossing experience easier and more convenient. Rather than measuring out string floss and using your hands to guide it between teeth, floss picks hold the floss on their own. Thus, the flosser only needs to use one hand when using this device. They’re small, plastic-handled tools (about 5 inches in length), sometimes with a sharp point on one end, and always with a c-shape on the other. Between this c-shape is a small, taut portion of floss to work between your teeth. These picks usually come with one, uniformly-sized strand of floss.
Here’s how to get the best floss with a pick:
- Hold the floss pick by the handle and point the open side of the c-shape towards your teeth.
- Using the same gentle sawing motion you would with string floss, work the floss pick between your teeth, being careful to keep the plastic edges away from your gums.
- Still holding the handle, move the pick up and down between teeth, ensuring you reach the area between your gums and teeth towards the top.
- Pull floss pick out from between your teeth and rinse the string to avoid re-distributing the waste you just removed.
- Repeat these steps on all teeth.
- Finish by dispensing the floss pick. Unfortunately, floss picks create even more plastic waste than string floss.
Air Flossers
Another flossing alternative is an electric air flosser. As their name suggests, they use a stream of air and tiny droplets of water to clean the surfaces and interproximal areas of your teeth. While this study indicates that they’re significantly less effective at removing biofilm than using string floss, they can function as an option for people with braces or crowns who struggle with other flossing methods. However, these flossers also have the option of water flossing, which removes significantly more plaque than an air flosser. They do have a couple advantages: less mess, because they don’t use as much water; smaller than water flossers & cordless; being good for sensitive teeth. Still, if the best floss possible is measured on actually effectively cleaning teeth, it’s plain to see this isn’t the best choice. For the sake of being comprehensive, here’s how to get the best floss it offers, following the instruction of the Philips Sonicare Airfloss:
- Fill the device’s water reservoir with lukewarm water. You can also use mouthwash.
- Position the nozzle in your mouth between your teeth at the gum line.
- Turn on the device by pressing the button. You’ll feel three bursts of air.
- Move the nozzle across your gum line until you’ve covered all interproximal areas and have cleaned your whole mouth.
- The process should take no longer than one minute. When you’re finished, turn off the device.
Water Flossers
Water flossers use water jets instead of string to floss your teeth. This is more effective, as water can get in smaller places than string cannot, removing more plaque. Additionally, since the water pressure is adjustable, many users find water flossers to be more comfortable than string floss. These flossers also may be the easiest option for people with braces, as they won’t have to worry about any strings getting caught in their wires.
Like the aforementioned types of floss, there’s a number of different water flossers on the market. Water flossers are also known as oral irrigators, dental water jets, or by the name of the most widely-known brand, Waterpik. For our purposes, we’ll focus on two water flossers: the popular Waterpik Aquarius Water Flosser and the newer multi-jet Instafloss.
How to use a Waterpik:
- Fill the water reservoir with water. This is the large, jar-like section of the device, and has a removable lid.
- Grab the handle and bring the tip of the flosser to your gumline at a 90-degree angle.
- Turn the device on.
- Maintaining the 90-degree angle towards your gumline, trace your gumline on the front sides of your teeth for your top and bottom teeth. Make sure to aim the jet between your teeth as well.
- Then, repeat this motion on the back sides of your top and bottom teeth, aiming at a 90-degree angle. Covering the whole mouth should take about two minutes and may require you to refill the reservoir.
How to use an Instafloss:
- Make sure to fill the reservoir with water until the water level is above the indicated line.
- Place the mouthpiece inside your mouth and bite gently with the short side behind your teeth (tongue side). Slide it to your back molars.
- Press the Floss button on your device to start flossing. At this point, water will start coming out.
- As water releases, move the mouthpiece so that it travels from one side of your mouth to the other. This should take 10 seconds.
Other Factors in Getting the Best Floss
Flossers who are eaten up with guilt about the amount of waste generated by string floss and floss picks should definitely opt for a water flosser. Of the water flossing options, the extra-busy individuals who can’t find the time to floss can look to the Instafloss, which only requires ten seconds. Instafloss also aims the jets at a 90-degree angle to the gumline, which is useful for those who want to remove the guesswork out of flossing properly.
However, some of you may still be wondering: shouldn’t the best floss be one that isn’t painful, uncomfortable, and tedious? What about my user experience? What about having fun?
Let’s be honest, flossing isn’t something most people look forward to. We’ve probably all encountered that widespread survey about how more than ⅓ of Americans interviewed would rather complete a dreaded activity like cleaning the toilet or sitting in traffic than simply floss their teeth. Even though flossing should take no more than a couple minutes per day, it can feel longer due to the pain, difficulty getting between teeth, unpleasant texture, and grossness of dealing with old food particles.
Self-efficacy and motivation go a long way when skill increases. However, with flossing, some of these tedious issues just don’t go away. Not to mention, there’s very few immediate results, especially when you aren’t even sure you’re being thorough enough! Water flossers do offer the advantage of minimal effort required by the user for a thorough, more effective floss.
The multilayered frustration around flossing is why we chose to cover a variety of flossing methods. Only you can decide what you won’t put up with in your flossing experience. We hope this blog helped you narrow it down. Remember to motivate yourself by choosing a flosser that will help you anticipate the best floss possible. You deserve to have healthy teeth!
1 comment
Hi! Happy November! Any updates on shipping for batch 1 and 2? Thanks!
———
Instafloss replied:
Hello Penelope,
We’re going to post our November update very soon – stay tuned!
With Smiles, The Instafloss Team